
Pravila foruma: Klikni tukaj za prikaz pravil na forumu
- Naslov teme mora vsebovati: proizvajalca naprave, poln model in kratek opis okvare.
- Sporočilo teme mora vsebovati: oznako tiskanega vezja (v primeru popravil strojne opreme), razširjen opis okvare, kaj je bilo preverjeno, zamenjano in/ali izmerjeno, sklep in vprašanje. Če ne morete najti oznake tiskanega vezja, morate prebrati TO TEMO. Če še vedno ne najdete oznake, prosim objavite kakovostne fotografije obeh strani matične plošče - potrebno je odstraniti vse folije in module, ki bi lahko zakrivali te oznake.
- Pred objavo nove teme, preberite vse teme v podforumu USPOSABLJANJA, in naredite predhodno diagnostiko na podlagi vsebine teh usposabljanj.
- Nalaganje celotnih navodil/shem, BIOS / firmware datotek, ali objavljanje povezav, ki vodijo do drugih spletnih strani s takšnimi datotekami, je SROGO PREPOVEDANO. Lahko objavite le majhen del navodil/shem, ali povezavo na BIOS datoteko v podforumu NEVERIFICIRANE DATOTEKE BIOS/EFI. V eni temi ne smete objaviti več kot eno stran navodil/shem. Datoteka ne sme vsebovati vidnih žigov "zaupno",, e-poštnih naslovov ipd.
- V eni temi lahko opišete SAMO eno napravo. Za vsako drugo okvarjeno napravo morate odpreti novo temo.
- Zahteve za sheme, boardview, fotografije matičnih plošč, datoteke BIOS-a ali servisne priročnike za storitve NISO DOVOLJENE. Če želite vprašati za katero koli od teh, odprite novo temo v podforumu ZAHTEVA ZA DOKUMENTACIJO & DATOTEKO BIOS/EFI.


Re: PS4 FAT CUH 1216A SAC-001 problem z diodami zenera
Napisal/-a Google Adsense [BOT] • 28 Junij 2022, 14:09


#2 Re: PS4 FAT CUH 1216A SAC-001 problem z diodami zenera
Napisal/-a Vogelek23 • 28 Junij 2022, 14:38
ELVIKOM LAB Ltd - Apple Repairs & PCB Design - Free Quotes! https://www.elvikom.co.uk
Jeśli skorzystałeś z mojej pomocy na Forum, możesz w ramach podziękowania wspomóc jego rozwój. Kliknij tutaj, aby dowiedzieć się więcej.
Jeśli skorzystałeś z mojej pomocy na Forum, możesz w ramach podziękowania wspomóc jego rozwój. Kliknij tutaj, aby dowiedzieć się więcej.


Najlepiej wylutuj diodę z układu. Diody zenera nie można 100% sprawdzić miernikiem, ponieważ wykożystywany jest efekt zenera to znaczy przewodzi przy określonym napięciu. Standardowo jednak jeśli jest dobra zachowuje się jak zwykła dioda.
Można sprawdzić tak. Podłączyć diodę zaporowo w szeregu z opornikiem. Zasilić napięciem wyższym niż przewidywane napięcie zenera. Dla danego napięcia zenera i zasilania, rezystor trzeba dobrać tak aby płynął prąd Iz (z katalogu). Teraz wystarczy zmierzyć napięcie na diodzie zenera. Jeżeli przy prądzie Iz (np 5mA - dla diod 0,5W) zmierzymy mniej więcej Vz katalogowe to dioda jest dobra.
Ja do sprawdzenia szczegółowo diody zenera wykorzystuję zasilacz laboratoryjny z regulowanym napięciem i ograniczeniem prądowym. Podłączam diodę zaporowo do płynącego prądu, ogranicznik ustawiam na minimalny i powoli zwiększam napięcie. W pewnym momencie napięcie przestaje rosnąć, jest to napięcie przebicia zennera.
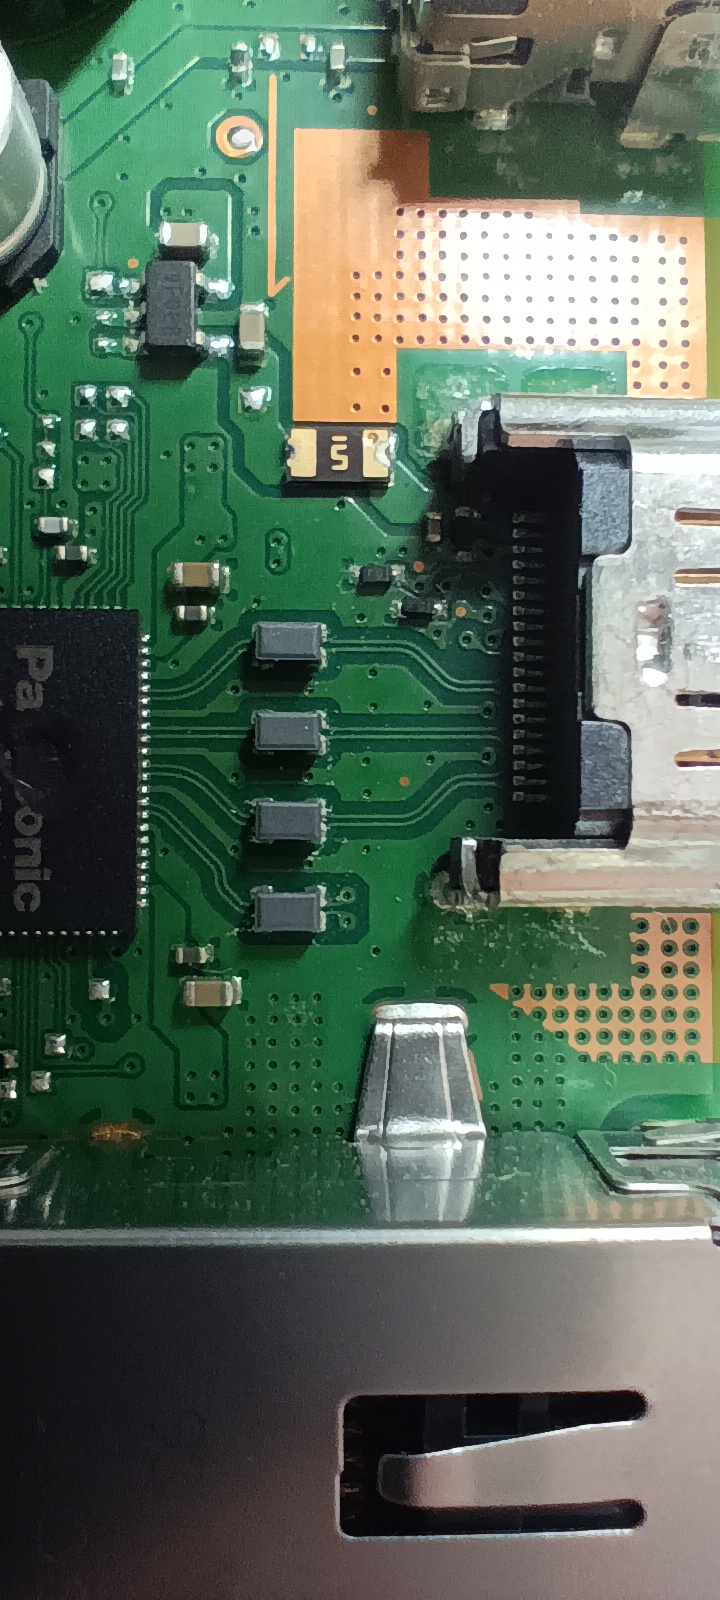
Dla świętego spokoju wymieniłem je ale jak wylutowałem wydaje mi się że były sprawne. A jeszcze z ciekawości to bez tych diod konsola powinna dać obraz ? Ale pojawił się problem taki że po wymianie układu i gniazda sprawdzeniu dalej konsola nie daje obrazu i przechodzi na białą diodę :/ Jesteście w stanie mi podpowiedzieć co można pomierzyć w okolicy tego układu co mogłoby się uszkodzic od wyładowania ?


Bulo napisal/-a:I teraz pytanie co to jest za układ pięcio nóżkowy zaraz za bezpiecznikiem? Stabilizator 5V? Jak mogę sprawdzić czy jest sprawny?This chip is a "Power distribution switch".
It's difficult to find the chip model, because Sony usually uses its own custom-made ICs in game consoles.
To check it, measure the voltage to ground before the fuse (on pin 4 of this chip). If there is 5V, also measure the resistance between pins 4, 5 of this chip. If the resistance is high (in kΩ range or greater), the chip is good.
matic napisal/-a:Bulo napisal/-a:I teraz pytanie co to jest za układ pięcio nóżkowy zaraz za bezpiecznikiem? Stabilizator 5V? Jak mogę sprawdzić czy jest sprawny?This chip is a "Power distribution switch".
It's difficult to find the chip model, because Sony usually uses its own custom-made ICs in game consoles.
To check it, measure the voltage to ground before the fuse (on pin 4 of this chip). If there is 5V, also measure the resistance between pins 4, 5 of this chip. If the resistance is high (in kΩ range or greater), the chip is good.
so far I have measured only the resistances and between these legs what you wrote is 860k ohm. I wanted to check the voltage, but I do not know exactly how to connect the cable from the power supply that I will connect 12 V to these long pins in the photo? And then I will have 5v on the output of the system, does ps4 need to be running? Earlier, when I started the console, it went straight to the white diode and now it resets once and only the second time it starts and goes into the white diode.
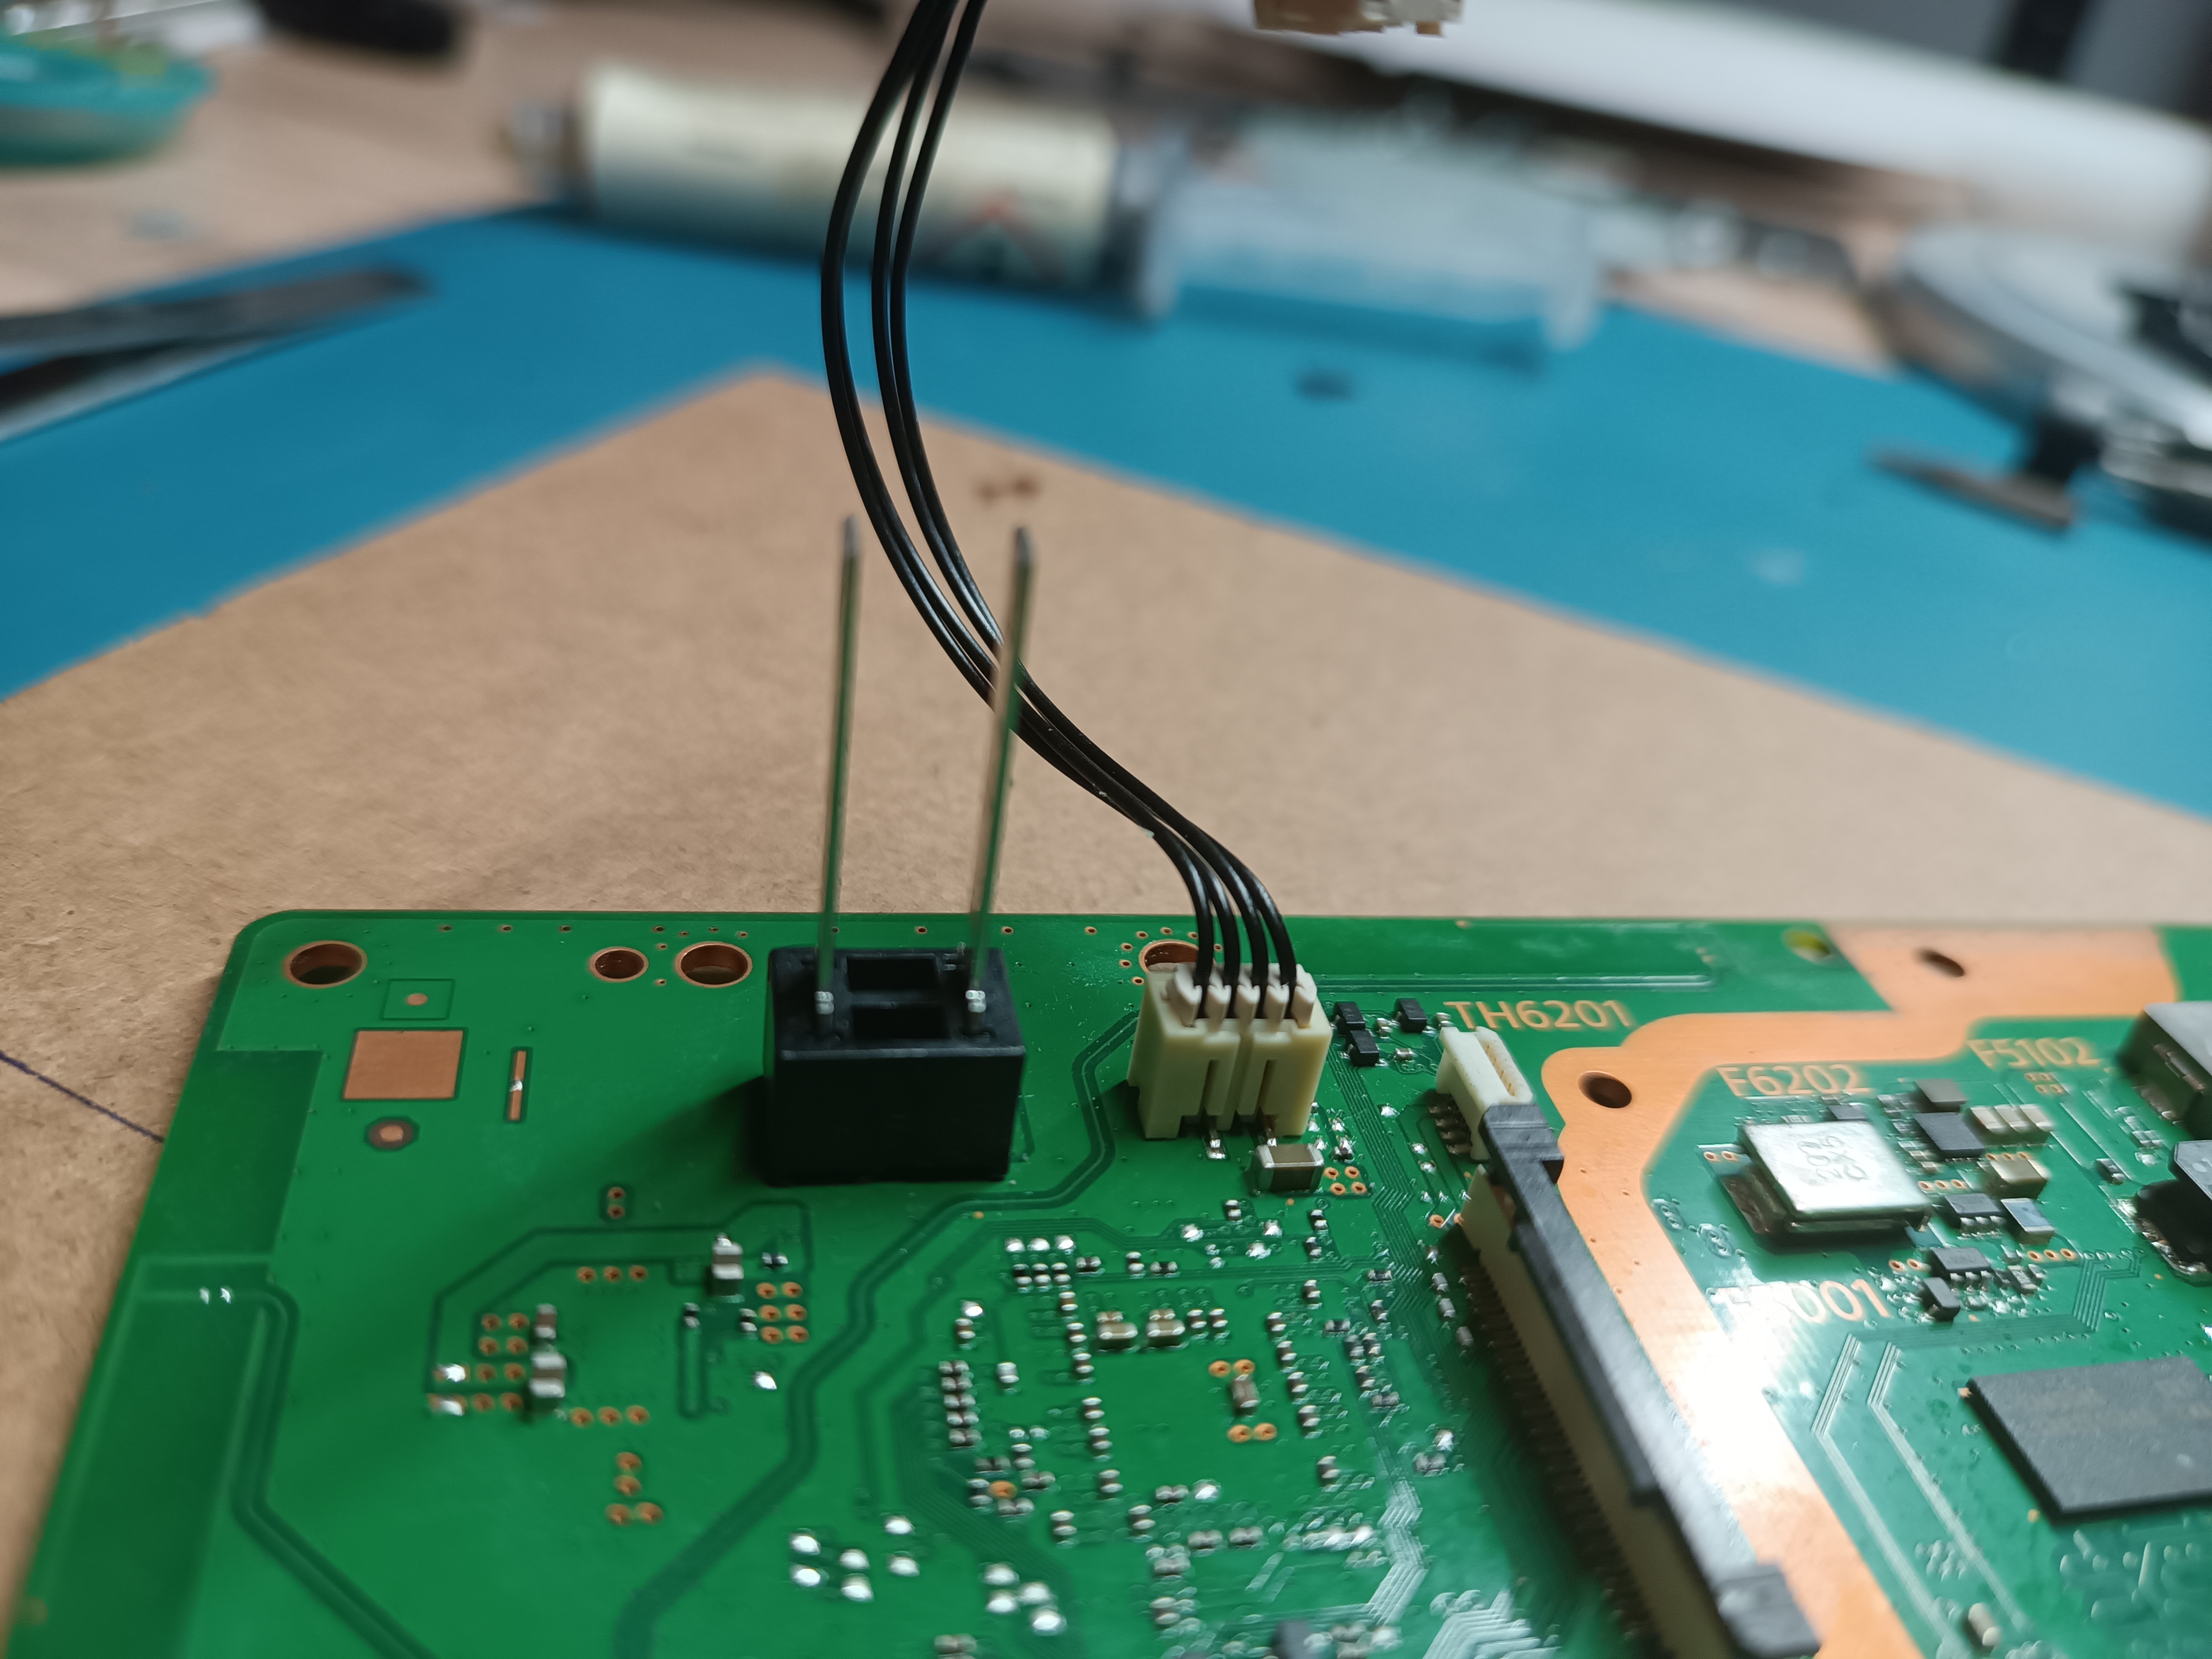
Bulo napisal/-a:I wanted to check the voltage, but I do not know exactly how to connect the cable from the power supply that I will connect 12 V to these long pins in the photo?The easiest way is probably to solder a thin test wire to the pin of the fuse, where you want to measure the voltage. Then assemble the console and measure the voltage on this wire.
Bulo napisal/-a:does ps4 need to be running?Yes, of course. The white LED on the console should be turned on.
matic napisal/-a:Is the RTC battery good (the voltage on it must be 3V measured on the board)?
If so, try to reset the CMOS. To do this, remove the RTC battery, bridge the battery socket pins for about 20 seconds, and reconnect the RTC battery.
The battery is functional, but the reset did not do anything. The console turned on, it went to the white LED after 2 seconds, I waited a little and after 30 seconds it reset and for 15 seconds there was a blue flashing LED and after that time it turned to white and it did not reset. I have no idea anymore, maybe the storm damaged the APU? Or replace the Panasonic chip again?
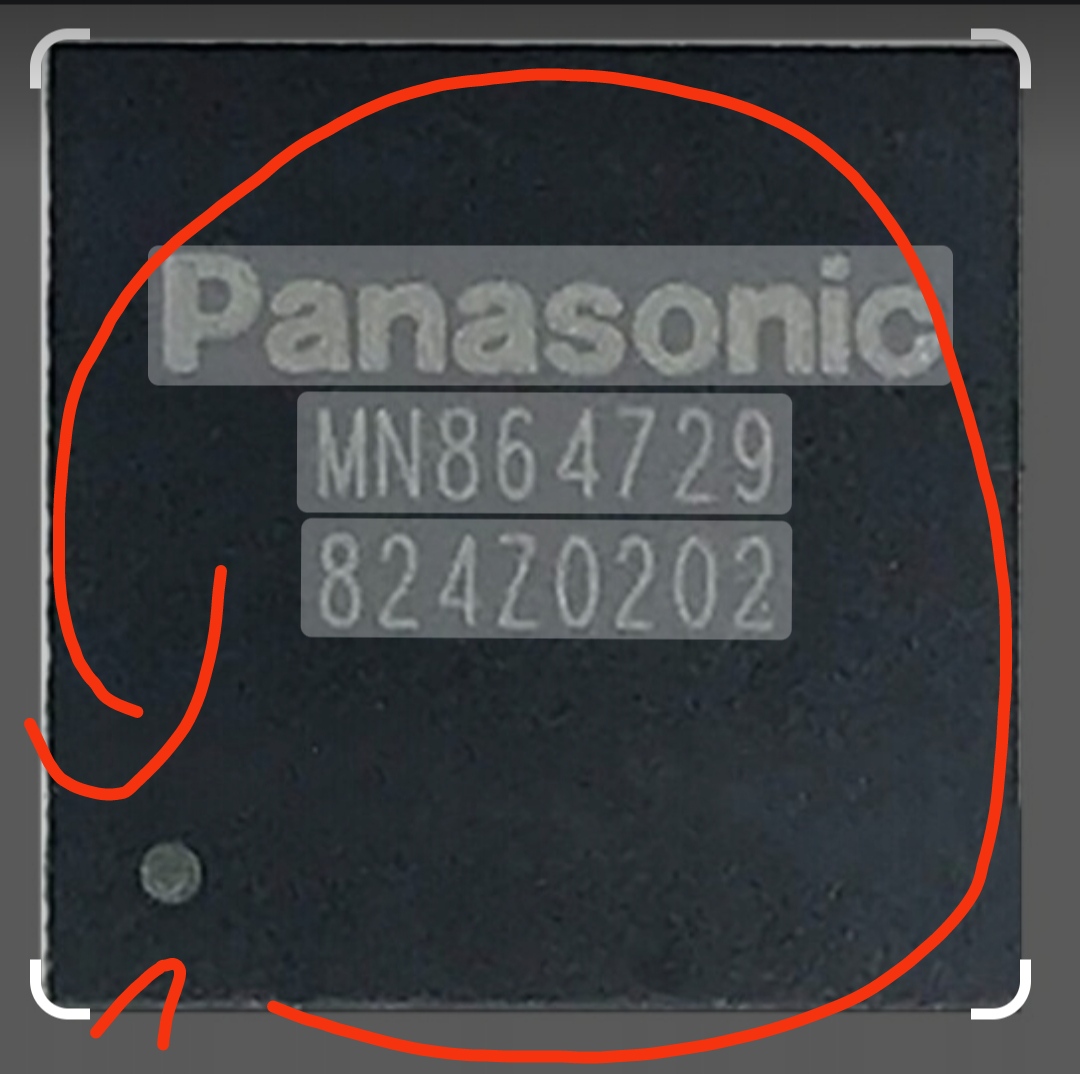
matic napisal/-a:Set your multimeter to the diode test mode and measure the voltage drops to ground on pins 3, 4, 7, 8, 10, 11, 15, 16, 18, 19, 25, 28, 29, 31, 75, 76, 79, 80, 81, 82, 85, 86, 87, 88 of Panasonic chip.
These are the measurements if I was holding the red multimeter probe to ground:
Pins: (3,4)-0.4v, (7,8,10,11,15,16,18,19)-0,786v, (25,28,29)-0.462v, (31)-0.4v, (75)-0,456v, (76)-0,409v, (79,80,81,82,85,86,87)-0,456v, (88)-0,480v
When measuring, I noticed that pins 3 and 4 are shorted together, should it be?
by applying the black multimeter probe to the ground, there were other voltage drops, I also have them saved, but I think I made the first measurement by applying the red probe to the ground and the black probe to the Panasonic system legs.
I hope that I was counting the results in the right direction, to be sure I will put a photo on which I marked the direction of counting.
matic napisal/-a:Bulo napisal/-a:When measuring, I noticed that pins 3 and 4 are shorted together, should it be?No, they shouldn't. Check, if you have a solder bridge between this two pins. If not, remove the Panasonic chip from the board and check if the short is resolved.
I desoldered the system and there was no short circuit. After re-soldering the same circuit, all connections are the same, just between leg 3 and 4 is something wrong. On the buzzer in the multimeter it shows 103 ohms between the legs 3 and 4, but on the test of the diode between these legs there is a squeaking noise and it shows 0.088V.
Re: PS4 FAT CUH 1216A SAC-001 problem z diodami zenera
Napisal/-a Google Adsense [BOT] • 19 Julij 2022, 10:20
Kdo je na strani
Po forumu brska: 0 registriranih uporabnikov in 0 gostov
_______________________________Vse pravice pridržane. Nepooblaščeno kopiranje vsebine te spletne strani ali njenega dela je strogo prepovedano.
Vse blagovne znamke, izdelki ali storitve, objavljene na tej spletni strani, pripadajo njihovim zakonitim lastnikom, so avtorsko zaščitene in se uporabljajo samo v informativne namene.